|
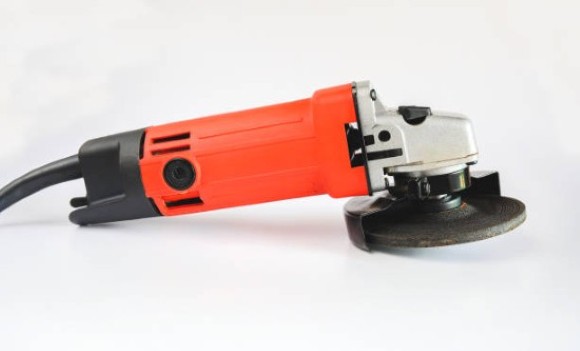
You've just bought a new buffing wheel to add to your collection of grinding and polishing tools, but you're not sure how to attach it to your angle grinder. If you're unsure how to attach a buffing wheel to an angle grinder, this guide will help. A buffing wheel is a tool accessory used to polish or shine surfaces. If you're looking to add a buffing wheel to your angle grinder, the process is fairly simple. The following guide is intended to help you attach a buffing wheel to an angle grinder the right way to get the best results. Steps on How to Attach a Buffing Wheel to an Angle GrinderAttaching a buffing wheel to an angle grinder is a relatively easy process. You will need to follow a few things in order to achieve success: Before You Begin:
Instruction:1. Remove the Current Grinding Wheel:In order to attach a buffing wheel to an angle grinder, the first step is to remove the current grinding wheel. To do this, first, make sure that the power to the angle grinder is turned off. Next, use a wrench to loosen the spindle nut. Once the nut is loose, carefully remove the grinding wheel. Be careful not to touch the shaft of the angle grinder, as this can be extremely hot. Finally, use a second wrench to loosen the flange nut and remove the flange. At this point, you should be able to slide on the buffing wheel and reattach the flange and spindle nut. Make sure that these are tight in order to avoid any accidents. 2. Secure the Buffing Wheel:Now that the buffing wheel is in place, you will need to secure it before beginning to use the angle grinder. The first step is to make sure that the power switch is in the off position. Next, use a wrench to tighten the spindle nut. Once this is tight, use a second wrench to tighten the flange nut. In order to prevent accidents while using the angle grinder, these two nuts must be tight. 3. Test the Buffing Wheel:Now that the buffing wheel is attached, you will need to test it to make sure that it is secure and will not come loose while in use. To do this, turn on the angle grinder and hold it close to the workpiece. Do not touch the buffing wheel to the workpiece, as this can cause damage. Instead, hold the angle grinder close to the workpiece and let it run for a few seconds. If the buffing wheel stays in place, it is secure, and you can begin using it. 4. Use the Buffing Wheel:Now that the buffing wheel is attached and tested, you can begin using it to polish or shine your workpiece. Be sure to follow all safety precautions while using the angle grinder. 5. Shut Off the Angle Grinder:Once you are finished using the buffing wheel, be sure to shut off the angle grinder. To do this, simply flip the power switch to the off position. Now that the angle grinder is off, you can carefully remove the buffing wheel. When removing the buffing wheel, take all safety precautions. Finally, use a wrench to loosen the spindle nut and flange nut. Once these are loose, you can remove the buffing wheel and reattach the grinding wheel. ConclusionWith this information, you will be able to give your car a professional look in no time now that you know how to attach a buffing wheel to an angle grinder. Be sure to read the manufacturer's instructions carefully and always wear safety gear when using power tools. With a little practice, you'll be an expert in buffing.
0 Comments
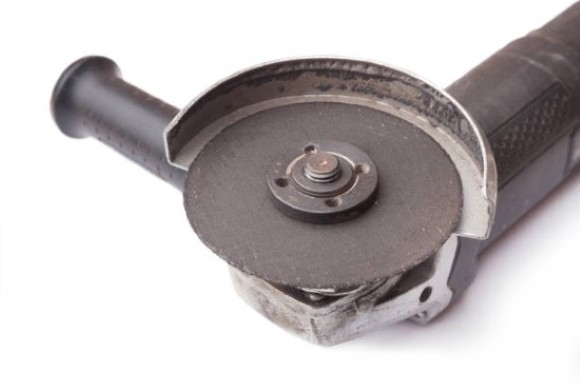
Any DIYer knows that having the right tools is essential for any project. And when it comes to power tools, few are more versatile than the angle grinder. Of course, like any tool, the angle grinder is only as good as its blade. Over time, the blade will become dull and will need to be replaced. Fortunately, changing an angle grinder blade is a relatively simple task that can be completed in just a few minutes. Here’s what you need to know. What Do You Need to Know Before Changing An Angle Grinder Blade?With so many different types of blades available, it can be difficult to know which one is right for your project. Here are a few things to keep in mind before changing an angle grinder blade: 1. The Type of Material You’re Working With:Different blades are better suited for different materials. For example, a blade designed for cutting metal will not work as well on concrete. 2. The Size of the Blade:Angle grinders come in a variety of sizes, and each size uses a different size blade. Be sure to check your manual or the label on the grinder to find out what size blade it takes. 3. The Speed of the Blade:Some blades are designed to be used at a higher speed than others. Be sure to check the speed rating of the blade and make sure it is compatible with the speed of your grinder. How to Safely Change an Angle Grinder Blade?Changing an angle grinder blade can be a dangerous task if not done correctly. Here are the steps you need to follow in order to safely change an angle grinder blade: 1) Unplug the Power Source:Before you begin, it is important to unplug the power source to your angle grinder. This will help to prevent accidents by ensuring that the blades are not able to turn on while you are changing them. Once the power source is disconnected, you can proceed to the next step. 2) Use Remove the Blade Guard:It is important to remove the blade guard. The blade guard is designed to protect you from the spinning blade, and it should always be in place when the angle grinder is turned on. To remove the blade guard, simply loosen the thumbscrew and slide it off of the blade. With the blade guard removed, you will be able to see the blade and have access to it for changing. Be sure to always wear gloves and goggles when working with an angle grinder to protect yourself from injury. 3) Remove the Old Blade from the Flange:The flange is the circular metal plate that holds the blade in place. To remove the old blade, you will need to unscrew the three screws that hold the flange to the body of the angle grinder. Once you have removed the screws, you should be able to pull the flange and blade off of the machine. Be careful not to lose the small washer that sits between the flange and the body of the angle grinder. You will need this when you install the new blade. 4) Attach the New Blade and Blade Guard:With the old blade removed, you can now attach the new blade. Start by placing the flange over the body of the angle grinder. Then, line up the holes in the flange with the threaded holes in the body of the machine. Once everything is lined up, you can screw the flange into place. Be sure to not overtighten the screws, as this can damage the threads. After the flange is in place, you can reattach the blade guard. 5) Test the New Blade:Before you use the angle grinder with the new blade, it is important to test it out. First, make sure that the power source is disconnected. Then, turn on the angle grinder and let it run for a few seconds. If everything is working properly, you should hear the blade spinning at a high speed. If you notice any strange noises or vibrations, be sure to turn off the machine and investigate the issue before using it further. With these steps, you should be able to safely change the blade on your angle grinder. ConclusionHopefully, now that you are familiar with the correct way to change an angle grinder blade, you will be able to change the blade in a safe and streamlined manner when it is time for a replacement. As you work with an angle grinder, it is imperative that you follow the steps outlined in this article and wear gloves and safety goggles at all times.
5/29/2022 0 Comments What Is an Angle Grinder Used For?
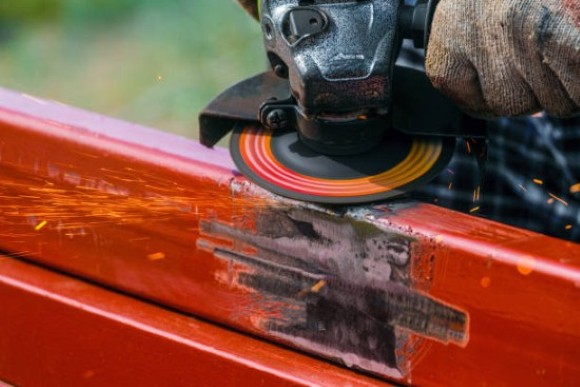
Anyone who has ever attempted a home improvement project knows that power tools are essential. One of the most versatile and useful tools in any toolbox is an angle grinder. Angle grinders are handheld power tools that can be used for a variety of purposes, from grinding metal to cutting tile. We are here to help you to understand why an angle grinder is important and what it can be used for. So, let’s get started. We're the Tools Auditor Author and offer impartial, in-depth reviews of hand tools such as power tools, hand tools, and machines from the top tool manufacturers. How an Angle Grinder Can Help You? If you’re tackling a home improvement project, an angle grinder can make the job easier and help you get the best results. Here are just a few of the things you can do with an angle grinder: 1. Cut Through Metal:When it comes to tackling tough projects, an angle grinder is a powerful tool to have in your arsenal. This handheld device can be used to cut through metal, concrete, stone, and more. And while an angle grinder can be a helpful tool, it’s important to use it safely. When cutting through metal, be sure to use a cutting disc designed for metal. 2. Remove Rust:One of the most common uses for an angle grinder is to remove rust from metal surfaces. While rust removal can be a challenging task, it’s definitely possible to do with an angle grinder. The key is to choose the right type of disc and to use it properly. For most rust removal applications, a flap disc or wire brush disc will work best. Just be sure to move the disc slowly and evenly over the surface of the metal to avoid damaging it. With a little care and patience, you’ll be able to remove even the most stubborn rust stains with an angle grinder. 3. Sharpen Blades:We all know how important it is to keep our tools sharp. A dull blade can not only make a job more difficult, but it can also be dangerous. An angle grinder is no exception. In fact, given the high speed at which the blade spins, it is even more important to keep the blades sharp when using an angle grinder. There are a few different ways to sharpen the blades on an angle grinder. The most common method is to use a grinding wheel. However, this can be difficult to do without damaging the blade. This method requires a bit more time and patience, but it is much less likely to damage the blade. 4. Polish Metal:In addition to being a great tool for cutting and grinding metal, an angle grinder can also be used to polish metal surfaces. This is especially useful for creating a high-quality finish on projects like car wheels or stainless steel appliances. To polish metal with an angle grinder, you’ll need to use a polishing pad. These pads are designed to withstand the high speeds of an angle grinder and can be used with a variety of polishing compounds. ConclusionWith the knowledge you now possess as to what angle grinders are used for, it is time to hit the road and start tackling those home improvement projects. Just be sure to use the tool safely and always follow the manufacturer’s instructions. With a little care, you’ll be able to tackle just about any project with an angle grinder.
|
 RSS Feed
